CloudWatch に fluentd monitor_agent のメトリクスを追加
こんちわ、パッションの伝道師、鰯です。 本日は、弊社でも導入が進んできた、fluentd を、ちゃんと監視しましょうということで、monitor_agentプラグインで、取得できるメトリクスを、ちゃんと監視サーバへ送るためのTipsを紹介。
1. monitor_agent プラグインを設定
monitor_agentプラグインの設定はドキュメントを参考にして、一応、ローカルのみのアクセスにして設定
|
1 |
[sourcecode lang="text"] <source> type monitor_agent bind 127.0.0.1 port 24220 </source> [/sourcecode] |
2. monitor_agent プラグインのメトリクスを取得
まずは、どんな項目が取得できるのか確認してみましょう
|
1 |
[sourcecode lang="shell"] $ curl -s http://127.0.0.1:24220/api/plugins.json | jq '.' { "plugins": [ { "config": { "type": "tail" "time_format": "%d/%b/%Y:%H:%M:%S %z", }, "output_plugin": false, "type": "tail", "plugin_id": "object:3fc23d75e2a4" }, { "config": { "port": "24220", "bind": "127.0.0.1", "type": "monitor_agent" }, "output_plugin": false, "type": "monitor_agent", "plugin_id": "object:3fc23d7470b8" }, { "config": { "add_tag_prefix": "extracted.", "key": "path", "type": "extract_query_params" }, "output_plugin": true, "type": "extract_query_params", "plugin_id": "object:3fc23f8898ac" }, { "config": { "type": "copy" }, "output_plugin": true, "type": "copy", "plugin_id": "object:3fc23f880e28" }, { "config": { "retry_wait": "2s", "retry_limit": "12", "type": "redis_counter", "port": "6379", "db_number": "0", "buffer_type": "memory", "buffer_chunk_limit": "8m", "buffer_queue_limit": "384", "flush_interval": "1s" }, "retry_count": 0, "buffer_total_queued_size": 0, "buffer_queue_length": 0, "output_plugin": true, "type": "redis_counter", "plugin_id": "object:3fc23d7e8594" }, { "config": { "flush_at_shutdown": "true", "flush_interval": "5s", "retry_wait": "10s", "buffer_queue_limit": "2560", "buffer_chunk_limit": "8m", "buffer_type": "file", "type": "forward" }, "retry_count": 0, "buffer_total_queued_size": 0, "buffer_queue_length": 0, "output_plugin": true, "type": "forward", "plugin_id": "object:3fc23cc8e0a4" } ] } [/sourcecode] |
上記のような感じで、アウトプットバッファなプラグインには、以下のような項目があり、これを監視対象として追加します “retry_count”: 0 “buffer_total_queued_size”: 0 “buffer_queue_length”: 0 弊社では、AWS環境でCloudWatchを利用しているので、CloudWatchへ定期的に取得した値をカスタムメトリクスとして追加しようと思います。
3. CloudWatchへカスタムメトリクスを追加
すでにカスタムメトリクスとしては、Amazon CloudWatch Monitoring Scripts for Linux を利用していたので、ゼロから CloudWatch に追加するものを作るのは、面倒なので、このスクリプト自体を拡張して、fluentdのメトリクスも送れるようにしましたので、そのパッチを公開しておきます。 Amazon CloudWatch Monitoring Scripts for Linux を入れると、こんな感じなので、定期的にメトリクスを送る、mon-put-instance-data.pl にパッチを適用します。
|
1 |
[sourcecode lang="shell"] $ wget wget http://ec2-downloads.s3.amazonaws.com/cloudwatch-samples/CloudWatchMonitoringScripts-v1.1.0.zip $ unzip CloudWatchMonitoringScripts-v1.1.0.zip $ ls -al aws-scripts-mon/ 合計 104 drwxr-xr-x 2 root root 4096 3月 10 14:01 2014 . drwxr-xr-x 3 root root 4096 3月 10 14:01 2014 .. -rw-r--r-- 1 root root 16726 2月 9 10:39 2013 CloudWatchClient.pm -rw-r--r-- 1 root root 9124 2月 9 10:39 2013 LICENSE.txt -rw-r--r-- 1 root root 138 2月 9 10:39 2013 NOTICE.txt -rw-r--r-- 1 root root 30 2月 9 10:39 2013 awscreds.template -rwxr-xr-x 1 root root 9376 2月 9 10:39 2013 mon-get-instance-stats.pl -rwxr-xr-x 1 root root 18712 3月 10 14:01 2014 mon-put-instance-data.pl [/sourcecode] |
解凍した CloudWatch Monitoring Scripts へ、gist から直接パッチを当てちゃいます、こんな感じで
|
1 |
[sourcecode lang="shell"] curl -s https://gist.githubusercontent.com/iwai/9478249/raw/3d8e047a6dd51b77d7c77c78f97885ca2976b3fe/mon-put-instance-data.pl.fluentd-monitor.patch \ | patch -u -p0 aws-scripts-mon/mon-put-instance-data.pl [/sourcecode] |
内容は以下、それと monitor_agent のjsonレスポンスをパースするため、JSON のモジュールを入れているので、CPANからなど入れておいてください、AmazonLinuxだとperl-JSONのrpmがあったので、yumから入れてました。
4. CloudWatchで監視する
使い方としては、--fluentd のオプションに、fluentdのホストとポートを指定すればOKです、これをCronとかに仕込んでおけば、あとは追加されたメトリクスをCloud Watchで確認するだけです
|
1 |
[sourcecode lang="shell"] ./aws-scripts-mon/mon-put-instance-data.pl \ --fluentd=127.0.0.1:24220 \ --aws-credential-file=./aws-scripts-mon/awscreds.conf [/sourcecode] |
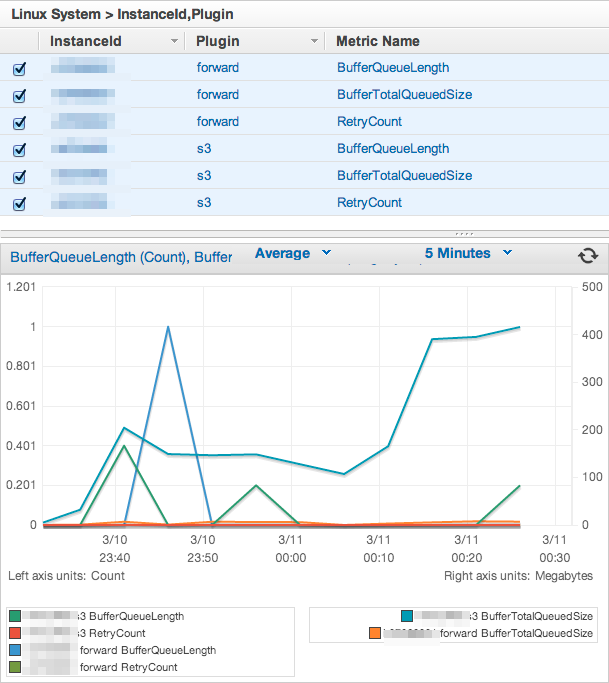
CloudWatchではこんな感じで、各プラグインごとに、RetryCount, BufferTotalQueuedSize, BufferQueueLength を取得できるようにしてます、ここからアラートやAutoScalingの設定すればいい感じですね!  それでは良いfluentdライフを!! 参考:『fluentd の監視エージェントを動かしてみた』


