
AWS LambdaでGoogleドライブとスプレッドシートの操作を自動化をしてみた
フロントエンドエンジニアのまめ太です。 僕の自作デスクトップアプリの一つに、起動履歴をGoogleスプレッドシートに送信し、記録しているアプリがあります。このシートでは、毎月1日に、いつの記録かをファイル名に含めてシートを別名保存したのち、コピー元のシートをクリアして新たにデータを記録できるようにしています。 この作業は、GoogleスプレッドシートとGoogleドライブ上で手動で行っているので、やっぱり面倒です。 というわけで、「一定期間おきに特定のスプレッドシートのコピーを取ってGoogle Drive上のフォルダに別名保存し、コピー元のスプレッドシートの内容をクリアする」という作業を自動化してみました。
利用した技術と構成
今回は、AWSのLambda関数として用意したNode.jsのスクリプトをCloudWatchのスケジュールトリガーで定期実行する形で自動化を行いました。 Lambdaは、サーバレスでプログラムを実行できるコンピューティングサービスで、今回のようにCloudWatchを使って定期実行させるものや、簡易なAPI、botをはじめ多くの用途に使用できます。プログラミング言語としては、Node.js、Java、C#、GoおよびPythonがサポートされています(2018/7現在)。 https://docs.aws.amazon.com/ja_jp/lambda/latest/dg/welcome.html https://docs.aws.amazon.com/ja_jp/AmazonCloudWatch/latest/monitoring/WhatIsCloudWatch.html スクリプトでは、Googleドライブを操作するDrive APIと、Googleスプレッドシートを操作するSheets APIを使いました。こちらはブラウザで使えるREST APIがあり、各言語用のライブラリが用意されています。 https://developers.google.com/drive/api/v3/about-sdk https://developers.google.com/sheets/api/guides/concepts
作業の流れ
大まかな作業の流れは、以下のようになります。
- クイックスタートでGoogleのAPIを使えるようにする
- GoogleドライブとGoogleスプレッドシートを操作するコードを書く
- AWS上で定期実行の設定をする
- スクリプトの修正
この流れをなぞって作業を説明していきます。
Google APIを使えるようにする
Google APIには非常に親切なクイックスタートがあり、こちらからGoogleアカウント上でAPIを有効化することもできます。 https://developers.google.com/drive/api/v3/quickstart/nodejs https://developers.google.com/sheets/api/quickstart/nodejs まずはDrive APIのクイックスタートの流れに沿って、Drive APIを有効化します。指示通りcredentials.jsonを保存してclient_secret.jsonにリネームしておきます。 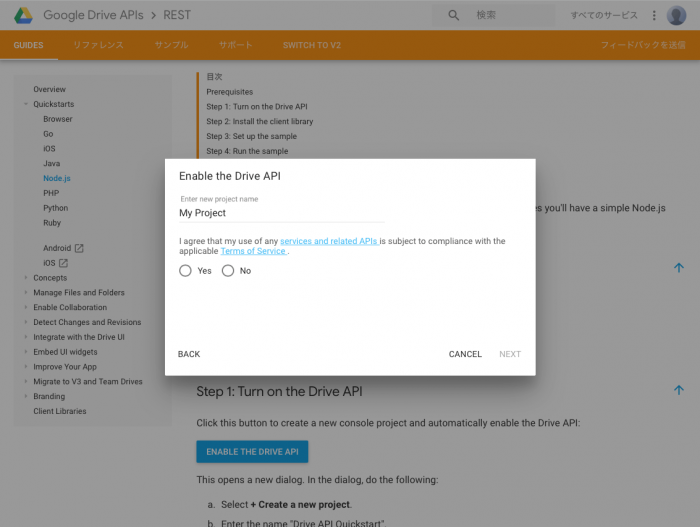 Node.jsの実行環境を用意し、プロジェクト用フォルダを作ります。 package.jsonを作っておきます。
|
1 2 3 |
[sourcecode lang="java"] $ npm init [/sourcecode] |
Drive API(とSheets API)用にクライアントライブラリをインストールします。
|
1 2 3 |
[sourcecode lang="java"] $ npm install googleapis@27 –save [/sourcecode] |
Googleドライブのクイックスタートからドライブのファイルを一覧表示するコードをまるまるコピペします。
|
1 2 3 |
[sourcecode lang="shell"] $ vim index.js [/sourcecode] |
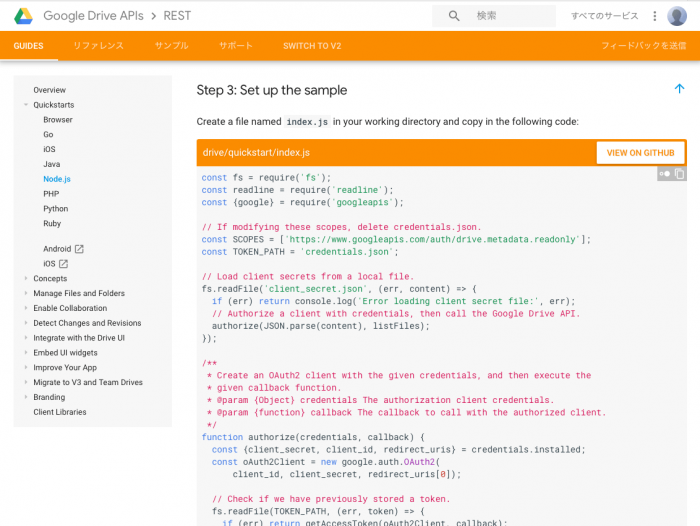 保存したスクリプトを実行し、きちんと認証が通った状態でAPIを使用できるか確認します。
|
1 2 3 |
[sourcecode lang="shell"] $ node . [/sourcecode] |
実行すると、認証用のURLにブラウザでアクセスして認証コードをコピーする指示があるので従います。 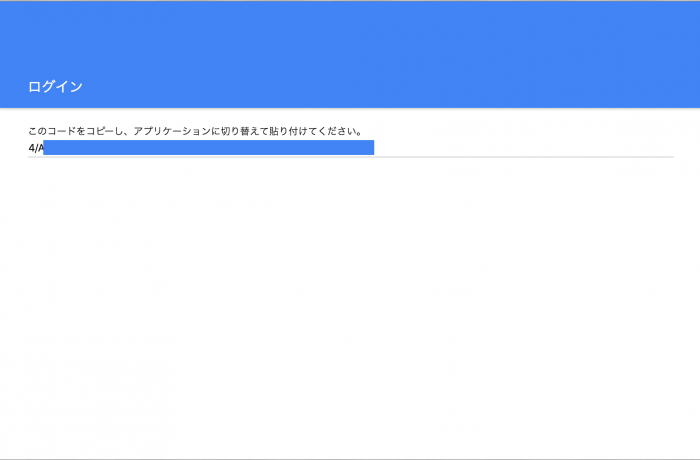 ターミナルにコードをペーストして認証を完了すると、Googleドライブ上の最新10個のフォルダとファイルがID付きでリスト表示されます。動作確認ついでに、記録シートのIDとコピーした記録シートの保存先フォルダのIDを保存しておきましょう。
|
1 2 3 4 5 |
[sourcecode lang="shell"] Files: 記録シート名 (ID) 記録シート保存フォルダ名 (ID) [/sourcecode] |
Google APIでコピー・リネーム・移動・クリアの処理を実装する
クイックスタートをコピペしたindex.jsは、ほぼそのまま使えるのでこれに追記していく形で実装します。 まずはSheets APIも有効化しましょう。クイックスタートからでもできますし、Google API Console上からでも有効化できます。Drive APIのときに保存したので、credentials.jsonは不要です。 ※ client_secret.jsonとcredentials.jsonはパブリックな場所に公開すると悪用されるかもしれないので注意してください。 OAuth 2.0のSCOPEを最上位の
|
1 2 3 |
[sourcecode lang="javascript"] 'https://www.googleapis.com/auth/drive' [/sourcecode] |
に変更します。
|
1 2 3 4 5 |
[sourcecode lang="javascript"] const SCOPES = [ 'https://www.googleapis.com/auth/drive' ] [/sourcecode] |
直上のコメントに「If modifying these scopes, delete credentials.json.」とあるので、credentials.jsonを削除して、再度認証できるようにしておきます。 今回の自動化の処理は、以下のクイックスタートのlistFilesメソッドのようにauthorizeメソッドのcallbackとして呼び出せるようにします。
|
1 2 3 4 5 6 |
[sourcecode lang="javascript"]// Load client secrets from a local file. fs.readFile('client_secret.json', (err, content) => { if (err) return console.log('Error loading client secret file:', err) // Authorize a client with credentials, then call the Google Drive API. authorize(JSON.parse(content), listFiles) })[/sourcecode] |
というわけでlistFilesと同様の形式でメソッドを作ります。
|
1 2 3 4 5 6 7 8 9 10 11 12 13 14 15 16 17 18 19 20 21 22 23 24 25 26 27 28 29 30 31 32 33 34 35 36 37 38 39 40 41 42 43 44 45 46 47 48 49 50 51 52 53 54 55 56 57 58 |
[sourcecode lang="javascript"]async function replaceLaunchHistory(auth) { const drive = google.drive({version: 'v3', auth}) const sheets = google.sheets({version: 'v4', auth}) const launchHisitoryFileId = '記録シートのID' const saveFolderId = '保存フォルダのID' const rootFolderId = 'root' // 当月の初日と末日 const today = new Date() const year = today.getFullYear() const month = today.getMonth() const first = new Date(year, month, 1) const last = new Date(year, month+1, 0) const usedPeriod = `(${year}/${month+1}/${first.getDate()}~${year}/${month+1}/${last.getDate()})` const promise = (func, param) => { return new Promise((resolve, reject) => { func(param, (err, res) => { if (err) return reject('The API returned an error: ' + err) resolve(res) }) }) .catch(err => { console.error(err) process.exit(1) }) } // 対象のスプレッドシートをコピーを作成 let param = { fileId: launchHisitoryFileId } const copy = await promise(drive.files.copy, param) // リネームと対象フォルダへの移動 param = { fileId: copy.data.id, uploadType: 'multipart', addParents: saveFolderId, removeParents: rootFolderId, resource: { name: `Launch History${usedPeriod}` } } await promise(drive.files.update, param) // シートをクリア let param = { spreadsheetId: launchHisitoryFileId, range: '!A1:ZZ', auth: auth } await promise(sheets.spreadsheets.values.clear, param) console.log('done') }[/sourcecode] |
※ 今回は記録シートがマイドライブのルートに存在するため、コピーもルートに生成されます。ルートフォルダには’root’というaliasがIDとして用意されているので、files.updateのパラメータでは親フォルダとしてこれを指定しています。 https://developers.google.com/drive/api/v3/folder 作ったメソッドをlistFilesと入れ替えましょう。
|
1 2 3 4 5 |
[sourcecode lang="javascript"]fs.readFile('client_secret.json', (err, content) => { if (err) return console.log('Error loading client secret file:', err) // Authorize a client with credentials, then call the Google Drive API. authorize(JSON.parse(content), replaceLaunchHistory) })[/sourcecode] |
実行してみて動作を確認します。
|
1 |
[sourcecode lang="shell"]$ node .[/sourcecode] |
Googleドライブにアクセスして、シートがクリアされていること、コピーしたシートが保存フォルダに指定したファイル名で配置されていることを確認しましょう。
LambdaとCloudWatchを使う
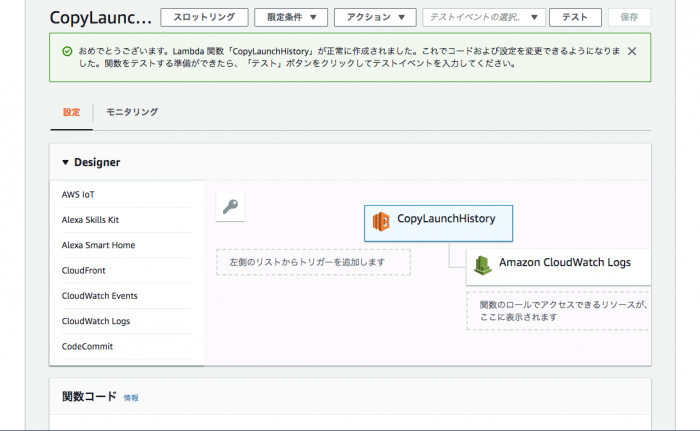
次はLambdaとCloudWatchの設定をして、定期実行できるようにします。 まずAWSのLambdaのダッシュボードから「関数の作成」を選択します。 適当な関数名をつけ、Node.jsは最新のものを、ロールはlambda_basic_executionでいいです。 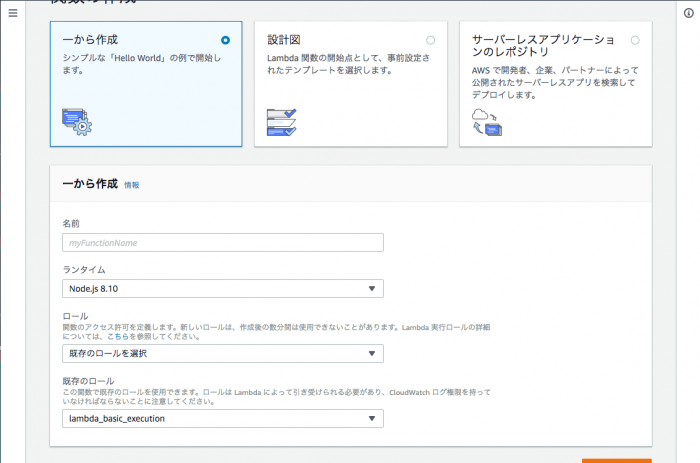 関数を作成したあと、Designerのリストから「CloudWatch Events」を選択してトリガーを追加します。 関数コードの表示エリアがトリガーの設定のものに変わるので、「新規ルールの作成」を選択します。
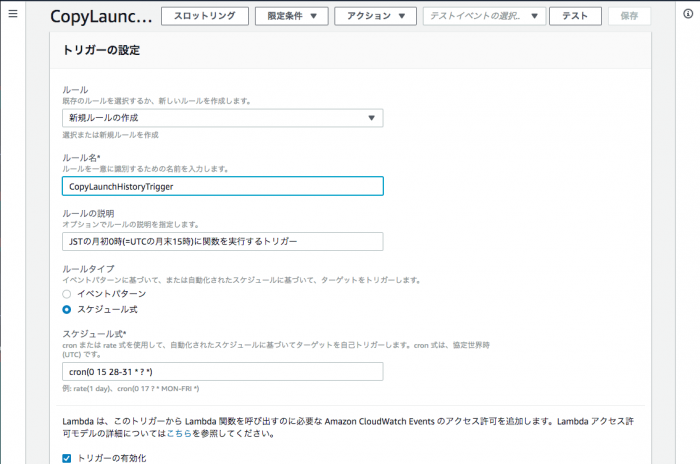
  今回の要件は月ごとにシートの保存と交換を行うことでした。そのため、トリガーは「JSTでの翌月1日0時に実行」するという動作が必要になります。 UTCとJSTは9時間の時差があるので、JSTの翌月1日0時だと、UTCの月最終日15時が定期実行のタイミングになります。cronは月最終日の指定ができないので、月最終日になる可能性のあるUTCの28~31日の15時に実行するようにトリガーを作成し、保存します。 ちなみにcronの式は以下のフォーマットで指定します。
|
1 |
[sourcecode lang="shell"]cron(Minutes Hours Day-of-month Month Day-of-week Year)[/sourcecode] |
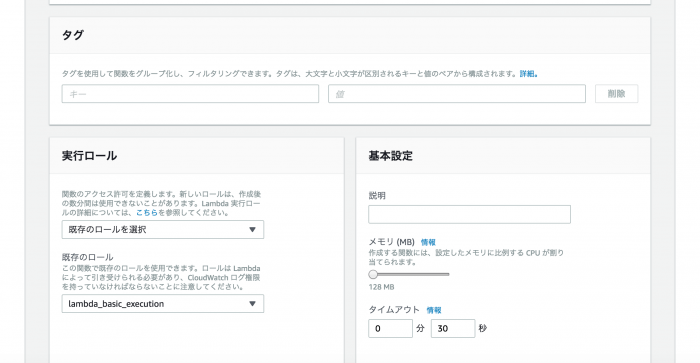
 最後に、基本設定のところからタイムアウトの時間を少し長めに変更しておきます。これでAWS側での細かい設定は終わりです。
Lambda用にスクリプトを修正していきます。 Lambdaから呼び出せるように、実行部分をメソッドとしてモジュール化します。
|
1 2 3 4 5 6 7 8 |
[sourcecode lang="javascript"]exports.handler = (event, context, callback) => { // Load client secrets from a local file. fs.readFile('client_secret.json', (err, content) => { if (err) return console.log('Error loading client secret file:', err) // Authorize a client with credentials, then call the Google Drive API. authorize(JSON.parse(content), replaceLaunchHistory) }) }[/sourcecode] |
このスクリプトはCloudWatchで設定したトリガーによってUTCの月末28~31日各15時に呼び出されます。JSTの翌月1日、つまりUTCの月最終日にのみ実行したいので、24時間後が1日であるのを判定条件にして、1日であればスクリプトのメイン部分を実行する形にします。
|
1 2 3 4 5 6 |
[sourcecode lang="javascript"]exports.handler = (event, context, callback) => { // 月末判定 if ((new Date(Date.now() + 24 * 3600 * 1000)).getDate() !== 1) { callback(null, 'Not at the biginning of the Month.') return }[/sourcecode] |
スクリプトができたので、必要なファイルをzip圧縮してアップロードします。 コマンドを作っておくと楽なので、package.jsonのscriptsにコマンドを追加しましょう。
|
1 2 3 4 |
[sourcecode lang="javascript"]"main": "index.js", "scripts": { "zip": "zip -r CopyLaunchHistory.zip index.js node_modules/ client_secret.json credentials.json" },[/sourcecode] |
|
1 |
[sourcecode lang="shell"]$ npm run zip[/sourcecode] |
zipを作って、アップロードします。保存後、テストして問題がなければ完成です。 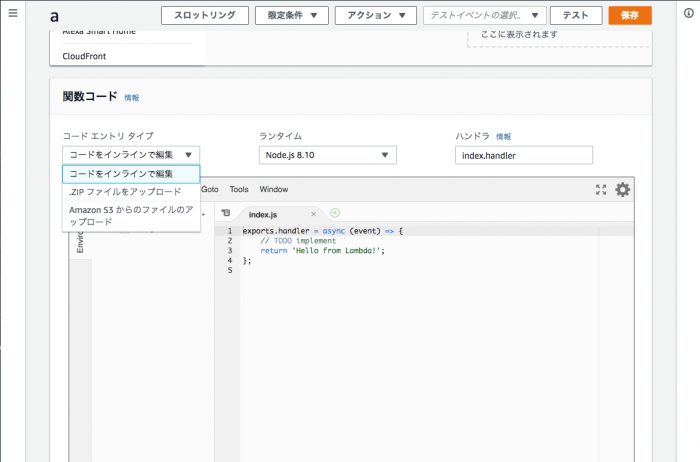
まとめ
今回はさくっとスプレッドシート周りの自動化を行いました。Lambdaを使ってできることの多さの一端を感じてもらえたかなと思います。 簡単のため省略しましたが、キーなどをよりセキュアに管理したい場合は、AWSのKey Management Service(KMS)やSecrets Managerを使ってみるとよいと思います。単にLambdaで環境変数に設定するだけでもKMSによって暗号化がかかるし変更を加えやすくなるのでおすすめです。 https://aws.amazon.com/jp/kms/ https://aws.amazon.com/jp/secrets-manager/ https://docs.aws.amazon.com/ja_jp/lambda/latest/dg/env_variables.html


